Application Overview
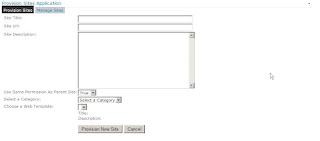
Figure 1 shows the sample application that I will use in my post. The application is hosted inside of a content editor web part which displays two tabs;one tab provides the capability to provision a site and the other provides the capability to delete a site. Very simple application and you can deploy it outside of SharePoint as well, with some minor tweaks to my sample you can host this inside of a .net page outside of SharePoint...Pretty cool huh..Now let's take a look at the "Provision Sites" tab, first we'll dive into how the application works and then wrap up by taking look at the code base.
Figure 1

Provision Sites tab
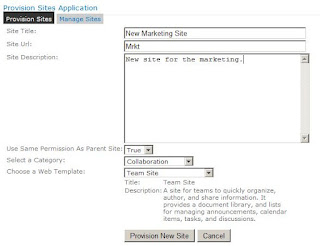
The purpose of this tab is provide the capability to provision a new site. Users will populate the form fields to set properties of their new site such as the title, url, web template....Below is a list of the form fields users will fill out:
- Site Title allows you provide a title for your site.
- Site Url allows you to define a url to your site.
- Site Description allows you to provide a description for your new site.
- Use Same Permission As Parent Sites determine if your new site should inherit permissions from the parent site or not.
- Select a Category and Choose a Web Template works together like a cascading drop down lists; the Select a Category provides a list of categories to choose from, when you select a category the Choose a Web Template list will dynamically populate with all activated site templates that is assign to the selected category. Once you have selected a web template, below you will see the name and description of the selected web template See Figure 3 and 4.

Figure 3 - shows a list of categories.
Figure 4 - shows a list of web templates based on the Collaboration category.
Click the "Provision New Site" button once the form is completed, then you should see a link to your new site and a notification message letting you know that your site has been created, see Figure 5.
Figure 5
Click on the link to navigate to your new site, see Figure 6.
Figure 6
Simple huh!! Now let's dive into the code base. Figure 7 shows code that does the following:
- Load the sp.js file first and once completed call the init function.
- Attaching the onchange events to the category and web template select lists.
- Then leverages the client object model to retrieve web templates from the site collection using the getAvailableWebTemplates(lcid, doIncludeCrossLanguage) method which returns a collection of web templates. See Figure 7.
We will use this to populate the Select a Category list.
Figure 7
Figure 8 provides the code details on how the category select list is populated. One thing to note here is the SP.WebTemplate.get_isHidden method; this determines if the site definition configuration should be displayed in the UI when creating new sites. We need to make sure that we do not display site templates that are no longer used in SharePoint 2010 because they could be deprecated and contain features that are no longer use in SharePoint 2010. If the method returns false then I'm invoking the SP.WebTemplate.get_displayCategory method to retrieve the web template's category value to add to the category list. Next we will take a look how the web template select list is populated, similar to Figure 8, but now we display web templates where the web template's category is equal to the selected category.
Figure 8
Figure 9 shows the code base to populate the web template select list. The function ShowWebTemplatesBySelectedCategory function is responsible for populating the web template select list; this method is called once a category has been selected. Similar logic populating the category select list, but now we're displaying the web template name. Next let's look at the code to provision a site.
Figure 9
ProvisionNewSite function is responsible to provision the new sites. First the function retrieves the data from the form and then it leverages the client object model's SP.WebCreationInformation class to provision a new site. Once we've created the object and filled out the necessary properties, we add the SP.WebCreationInformation object to the SP.Web class, call the Sp.Web.Update method to provision our new site. Now this doesn't actually happen until after you call the invoke the SP.ClientContext's load and executeQueryAsync methods. See Figure 10.
Figure 10
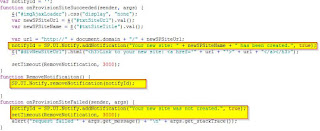
If all goes well, then you should see a link below the button that will take you to your new site and a notification message letting you know that your site has been created. Figure 11 shows the code that displays the notification message both on the succeeded and failure functions.
Figure 11

Cool huh? With little code you can provision sites on the using javascript. Next we're going to take at "Manage Sites" tab; we'll review the application first, its purpose and then the code.
Manage Sites tab
The Manage Sites tab is a smaller form which sole purpose is to delete a site. Figure 12 shows a list of all subsites that a user chooses from, once a site has been selected details about the site such as the relative URL, title and description. See Figure 13
Figure 12
Figure 13
To remove the site click on the "Remove Selected Site" button which deletes the site and you will see an alert button letting you know that your site has been deleted, see Figure 14.
Figure 14
See Figure 15 shows the Sites and Workspaces page which provides further proof that you site has been deleted.
Figure 15
Easy, huh? So is the code base. ShowAllSubSites and onGetAllSubsitesSucceeded functions, shown in Figure 16, is responsible for populating the select list with subsites. Once thing to note here is the ShowAllSubSites function is called when the user clicks on the "Manage Sites" tab, see Figure 17 for the html code.
Figure 16
Figure 17
Once a site has been selected, basic properties about the site are displayed to the use, shown in Figure 18. The DisplayWebsiteProperties function accepts a singe parameter; WebsiteUrl which is passed to the SP.ClientContext constructor so can do some work on the site I selected. Now we can gather and display the site's properties; checkout the onDisplayWebSitePropertiesSucceeded function for details.
Figure 18
RemoveSite function is called once the Remove Selected Site button is clicked. All we're doing here is creating an instance of the SP.ClientContext object based on the site that we want to delete and then we're calling the SP.Web.deleteObject() method to actually delete the site, see figure 19. Once the site has been deleted, you will see an alert message letting you know that your site has been deleted, take a look at the onSiteDeletedSucceeded function for details.
Figure 19
And that's it folks.
Conclusion
In conclusion you can leverage the SP.WebCreationInformation class to provision sites on the fly and the SP.Web.deleteObject method to delete sites. You can take this example and extended into the areas of user management; leveraging the SP.User, SP.UserCreationInformation and SP.Web classes to add/modify/remove users from a particular site.
Well I hope this post was informative and motivates to take a look at SharePoint's Client Object Model. Let me know if you have any questions or comments regarding this post or in anything general. Thanks!!
Sample Source Code


